Back in the spring, when I was making all my wedding things, I thought that maybe, one day, possibly, sometime in the future, I might make a historical bodice of some sort to go with my blue silk petticoat. The petticoat was so pretty, I loved the sheen of the silk, so why not use it as the skirt for a gown?
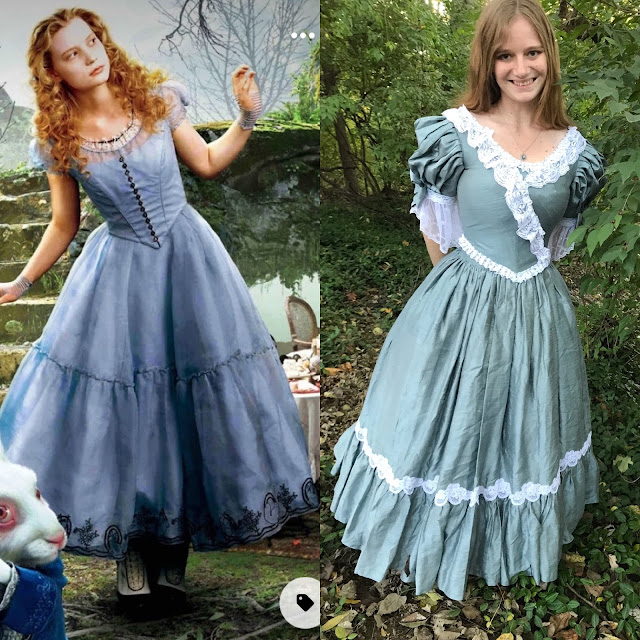
This "maybe one day I'll make a bodice to go with this blue silk skirt" idea got sped up a bit when my husband and I decided to dress up as Alice and the Mad Hatter for Halloween. In the live action Alice in Wonderland movie Alice wears a blue dress with a wide ruffle at the bottom. Sound a bit like my petticoat?
Alice's bodice has short puffed sleeves, a basque (pointed) waist, buttons down the front, and white trim around the neckline. I could certainly make a historical bodice which incorporated a few of these elements! My goal wasn't a "screen accurate" Alice costume, just an Alice-inspired historical costume, if that makes sense.
My initial idea was an 1840s evening bodice similar to this one from the movie The Young Victoria. But then I started looking at fashion plates. I came across several prints for 1830's evening gowns with wide ruffles at the bottom of the skirt - just like what my petticoat had.
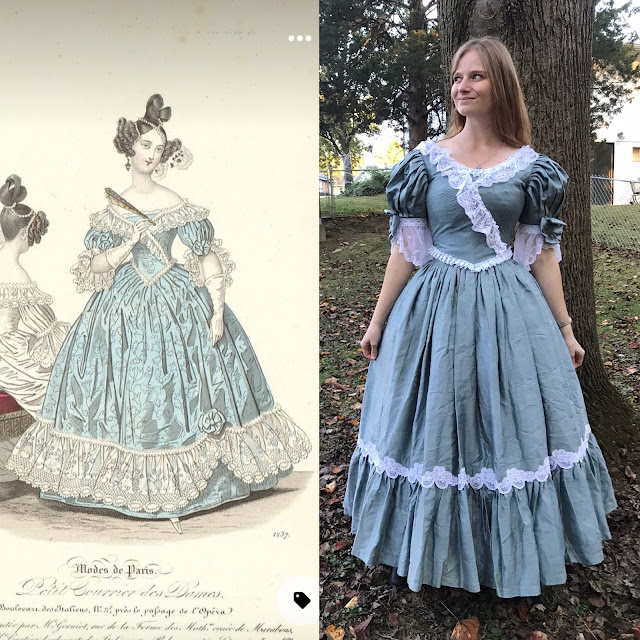
I came across this 1836 fashion plate on Pinterest and fell in love! Short puffed sleeves, basque waist, white trim around the neckline, it would work for Alice! All it was missing was the buttons, but I didn't love those anyway, so I was happy to leave them off. This was the bodice I was going to make for my Halloween costume!
On my next trip home to visit my parents, I grabbed the remaining blue silk curtain panel and a half from my fabric stash, and a handful of patterns to mash together to make this bodice.
I grabbed the bodice pattern from my 1840's black wool dress, because I thought the 1840's shape and basque waist pattern might be helpful, but I wound up not needing it.
For the sleeves I used the sleeve pattern from McCall's 8017, and just pleated sleeves to match the fashion plate, rather than gathering as the pattern suggested.
The flat lining was cut from a cotton percale sheet I had on hand, and the outer pieces were all cut from the remaining silk curtain panel. I used heavy duty zip ties for boning at the center front and side seams and made the bone casings from some cotton twill tape I had on hand. The back seams, armscyes, neckline and bottom edge were all piped. I decided to have the back fasten up with hooks and eyes, as that's less fiddley and time consuming than lacing is. Both lacing and hooks and eyes were common back fastenings for evening gowns of this era.
I started by assembling the front flat lining - sewing up the darts and the center front seam. Then I layered on the blue silk pieces to get the overlap shown in the fashion plate - right over left, trimmed in lace.
All around the neckline is a wide lace ruffle. I used the same lace I used for the sleeve ruffles on my Edwardian evening gown last year.
I got this HUGE (over 100 yards!) roll of 1" wide lace trim from the local sewing room that sells donated fabric and notions for $1 per pound. It was just what I needed for the frills on this lace hog of a bodice! (I still have plenty left over for future projects too of course!)
All the lace was sewn on by machine. The stitching blends in to the lace design just fine, and I didn't have time to do much hand sewing on this bodice - I only allowed myself one week to make it!
Thus, the bodice is entirely constructed by machine, with some hand finishing work - which the kittens attempted to help with.
The sleeves are trimmed with wide lace ruffles, made from the same net lace I used for the collar of my wedding dress.
The bodice was made, start to finish, in one week.
Since I'd used this bodice pattern before, and the dress I made from it still fits me, I didn't bother making a mock-up.
Thankfully, it did!
Ok, it was a little tight, but my husband managed to get all the hooks and eyes done up so we're calling it good!
I threw on a white apron I'd made in one evening to hopefully give the dress a bit more of an "Alice in Wonderland" look, left my hair loose, and I was ready for our evening.
We went over to our friends' house for dinner, a movie, and to hand out candy to trick-or-treaters.
My friend graciously took pictures for me in her back yard. We did our best to figure out Alice in Wonderland-y settings and poses.
Not bad at all for something made out of old curtains, sheets, and second hand trim in only a week!
And, while not screen accurate at all, I think it worked pretty well as an Alice costume too!
Especially when paired with my husband's magnificent (if I do say so myself) Mad Hatter costume!


